DIY Play Equipment for your Backyard
min read
Nothing brings more joy to a parent than watching their kids use their imagination, and what better way than to put their imagination to work with some outdoor play equipment - DIY style.
But what’s also rewarding is actually succeeding in building your very own outdoor play equipment for the kids. That’s “Parent of the Year” material right there, and it comes with bragging rights!
You see, the beauty of DIY is, you make the call on how big or small you want to go. So if you are limited on backyard space or have large acreage, the sky is your limit on how creative you want to get.
To kick start your DIY Backyard Play Equipment project, we have listed some ideas below.
Enjoy
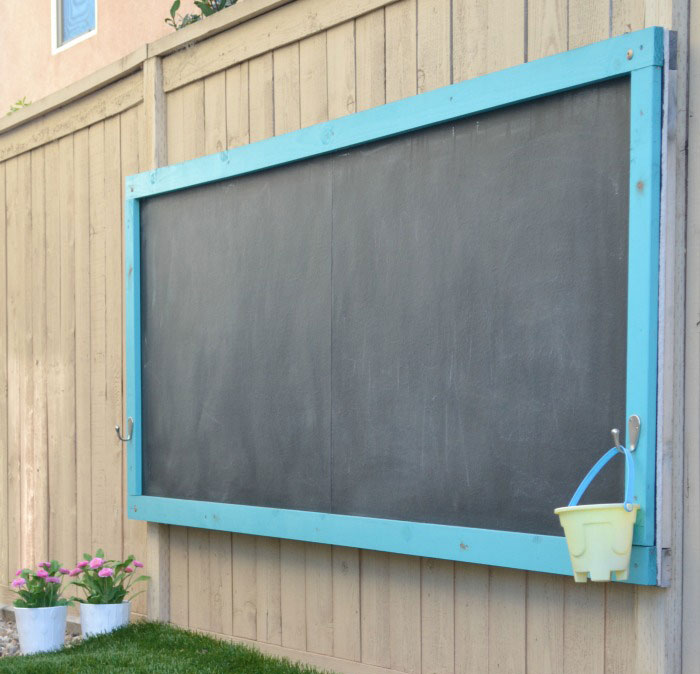
Outdoor Chalkboard
- 2400x1200 marine ply board
- 4x lengths of timber palings (for the frame)
- 1 packet of wood screws (to screw the boarder to the ply)
- 5/6 x 3 lag bolts to attach the finished product to the fence
- 2ltr tin of chalk board paint
- 1ltr outdoor paint (your choice of colour) to paint the frame
- 2 paint brushes (1x wide head and 1x medium head)
- Electric or battery screw driver
- Hooks to hang the buckets of chalk
- Chalk
- Small buckets
- Duster
- Cut the lengths of timber palings to fit the 2400x1200 marine ply to make border (toss the cut offs).
- Paint the ply with three layers of chalk board paint (making sure you let each layer dry first before you start on the next layer).
- Paint the cut timber palings with the outdoor paint (three layers again for best results, making sure each layer is dry before start on the next layer).
- Screw the cut timber palings to the outer edge of the ply to form the border (once all layers of the paint is 100% dry).
- Measure out on the wall, the height of where you want the chalk board to hang and mark it out.
- Screw lag bolts to each corner of the chalk board to the desired wall or fence, using the marks as a guide. Once positioned correctly, finish off with securing a further 4 lag bolts through the centre of the top, bottom and both sides of the frame through to the wall.
- Screw the hooks to each side of the chalk board on the frame (arms reach for the kids).
- Hang a bucket on each hook, filled with chalk and the chalk duster.
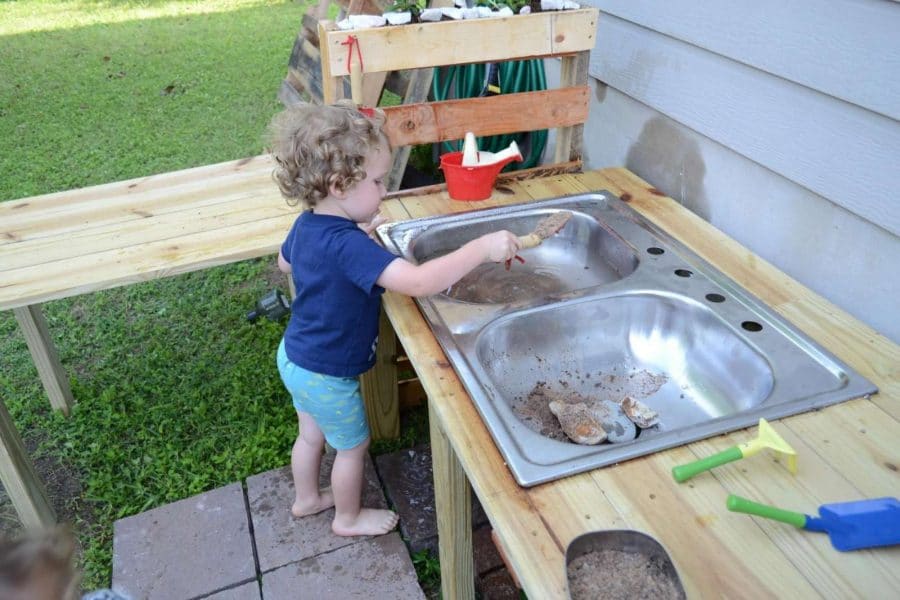
Cute DIY Mud Pie Station
- Wood – Four 2x4’s and four 1x6’s
- Scrap wood if you have any (old fence palings)
- Pallets – Two half pallets or one full pallet that can be cut in half
- Wood screws
- 10 Pavers
- Sink
- Drain strainer
- Flowers
- Soil
- Create a table top by cutting two of the 1x6x8 boards in half leaving four equal length boards.
- Use the scrap wood as the cross sections to secure the lengths of wood (cut scrap wood to length if you need to).
- Use the 2x4’s as legs and screw into the cross sections with wood screws.
- To make the second table (use the remaining 1x6’s boards) lay out to form the table top and secure off each end using the remaining scrap wood.).
- Measure out the sink and mark with a pencil (for a drop-in sink), on the outer side of the sink hole markings, screw two additional pieces of the scrap wood to keep ends secure when cutting the hole for the sink (making sure the screws are short enough and won’t come through the top of the table where it could cause injury).
- If you are using an actual sink , it should come with brackets and screws to attach to the wood, use these screws to fix the sink to the table.
- Cut pallet in half (or use the two half pallets) and attach each half to each end of the table with the wood screws (the pallets will act as legs for the table, so position the height of the table in line with the first table).
- Use remaining 2x4’s to secure as legs to the second table, position in the middle on each side (front side and back side), making sure they are cut to the correct table height.
- Add a bottom to the top section of the pallet on each side of the table (this will be for the garden bed to plant the flowers).
- Half screw in any remaining wood screws on each of the pallets to use as hooks to hang any watering cans, pots, strainers, cups, etc.
- Get the kids to plant the flower boxes and your DIY outdoor mud kitchen is good to go.
DIY Rock Climbing Wall
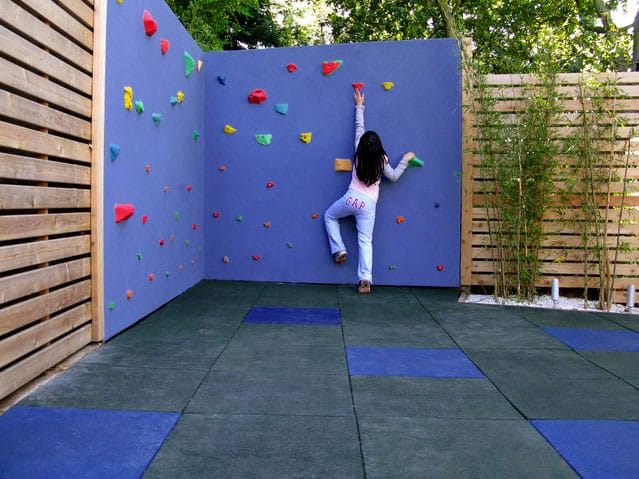
- Large piece of ply wood (up to you on height)
- Rock climbing pieces (can be purchased from Bunnings)
- Screws
- Electric screw driver
- Mark out where you want the rock climbing pieces to go on the ply.
- Position the climbing pieces on the areas marked, secure the climbing pieces to the ply by screwing into place.
- Secure the ply to a sturdy fence or wall (make sure the climbing wall is 100% securely attached to a sturdy fence or wall and won’t be at risk of falling, as this could cause serious injury).
- Tip: having a soft landing at the base of the climbing wall (sand or soft matting) to help prevent injuries from any falls.
DIY Leak Proof Blob
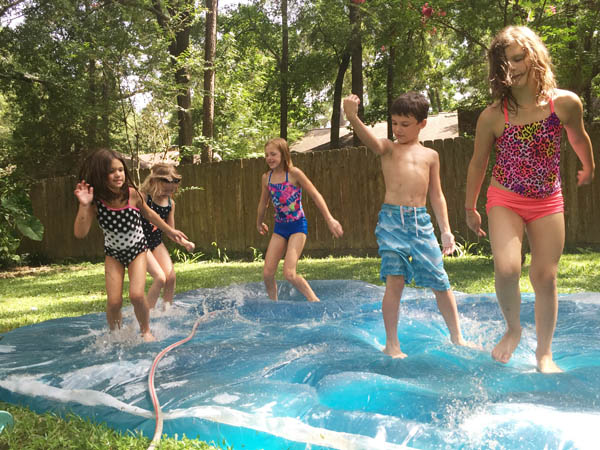
- 4 mil Painters Plastic 4m x 8n roll or what’s available around this size
- Ironing board and iron
- Baking paper
- Duct tape
- Turn your iron on to its hottest setting. (Tip: keep your ironing board flat on the floor so that the weight of the plastic doesn’t cause it to move or slide).
- Roll out your plastic in your largest room, and fold it in half – to the size you want your water blob (Don’t worry about aligning the edges, they will align as you go!).
- You’ll start out with a long piece of baking paper (about 600mm long).
- Fold it in half, length-wise and draw a line about 2-inches out from the fold (This will be your guide of how far into iron).
- Begin with the edge of plastic opposite of its fold, starting at the corner. Open up your marked baking paper and place the opposite end of the folded side of the plastic inside the baking paper, aligning it to the fold of the baking paper.
- Then fold the baking paper back over.
- Now use your hot iron to slowly melt the plastic together by running the iron across the line of your baking paper (do not let the iron touch the bare plastic as it will melt a whole in it and make a huge mess all over your iron).
- Press firmly, but not too hard – This can weaken the plastic by thinning it out with too much pressure.
- Let it cool for a few seconds before removing the baking paper (If you remove the baking paper too early you could risk stretching the plastic).
- Continue to seal the edges, overlapping a few inches to make sure there are no holes.
- After sealing the end opposite of the fold, work from the sealed edge toward the fold, everything will align perfectly.
- Carefully cut a small slit in the folded end of the plastic, near the corner.
- Place a hose in a few feet, and prop them up so that the water does not spill out while you fill your water blob (this may take around 30mins to fill).
- Add food colouring to the water if you wanted to make the blob stand out.
- Seal off the hole with a piece of duct tape, this way you can use it a few times.
- Spray some water on top and away they go.
DIY Music Wall
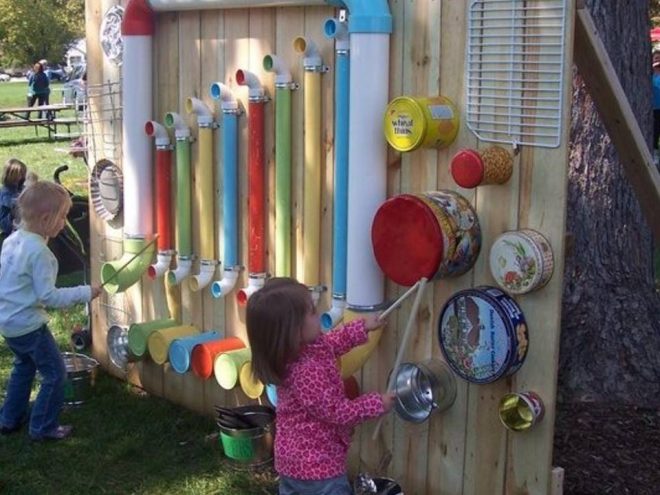
- 4-6 timber pallets
- Old biscuit tins or tin buckets (multiple sizes)
- A variety of lengths of PVC pipe with an elbow for each end
- PVC wall brackets (2x per length)
- 2x sizes of timber screws – pack of 20 per size (to fit the brackets and to secure the tins and other items)
- Pair of drumsticks (or wooden spoons) per child
- Any other materials you would like to hang on the music wall
- Screw the 4-6 pallets together (your choice how high or long you want your music wall to be), make sure this is secure and not flimsy.
- Safely secure to the pallet music wall to a wall or fence (ensure this wall is 100% firmly secured and won’t fall over and cause any injury to your little ones).
- Cut PVC pipes to different lengths (making sure they will fit the music wall).
- Add the elbows on each end of the PVC pipes.
- Secure the pipes to the wall by screwing the brackets into the wall (bracket at the top and bottom of each pipe).
- Screw in the tin buckets or biscuit tins to the wall.
- Screw in any additional items that you wish to add.
- Hand over the drumsticks or wooden spoons and let your little ones drum out.
Springfree Laser Course
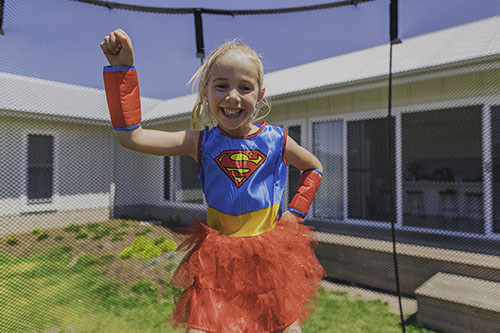
- Springfree Trampoline
- Wool
- A buzzer (not compulsory)
- A timer (not compulsory)
- Superhero dress-ups (not compulsory)
- Start with one end of the wool and tie around one of the net holes.
- Move the wool in either a downwards or upwards direction towards the opposite side and attach to the net.
- Continue to zig zag the wool around the trampoline, creating criss crosses around the outside and in the middle of the trampoline. You can even go under the trampoline as well to extend the 'course'.
- Have the kids jump in (in their super hero dress ups) and try to make their way around the trampoline without hitting the wool.
- To make it a bit of extra fun, have a buzzer on hand to blast out every time they do hit it, requiring them to start again.
- If you have a few kids, you can time how long it takes each of them to complete the course to see who can do it the fastest!